5.5. Administration
5.5.1. User Groups
Each MQC user has to be assigned to one of the following user groups, which are available at the MQC Server:
MQC Editors
MQC Users
5.5.1.1. MQC Editors
Users belonging to the “MQC Editors” group can create new projects (see Figure 5.7), adapt existing projects, e.g. changing the configuration, save projects or browse already stored projects from the library.

Figure 5.7 MQC Editors are able to create new projects and to load existing projects
A user belonging to the group “MQC Editors” has access to the configuration menu. For more information see Managing Configurations.
5.5.1.2. MQC Users
Users belonging to the user group “MQC Users” can only browse projects stored in the MQC Server library or on a network drive connected to the server (see Figure 5.8).

Figure 5.8 MQC Users are only able to load existing projects from the library or from a network drive
Once an existing project has been loaded, a viewer has no access to the Configuration menu
and is not able to change the configuration (e.g. by adding a quality model
or a project structure) or the settings of the project.

Figure 5.9 Panel functionalities available to viewer users
5.5.2. Server Library
The MQC Server library is a virtual storage of created projects (.dxp files locally) and Automation Jobs.
Every user has access to the same library, but the user permissions can be restricted to grant the access to specific folders only.
While a user belonging to the group MQC Users can only open existing projects, an MQC Editors user can also save a new project in the library.
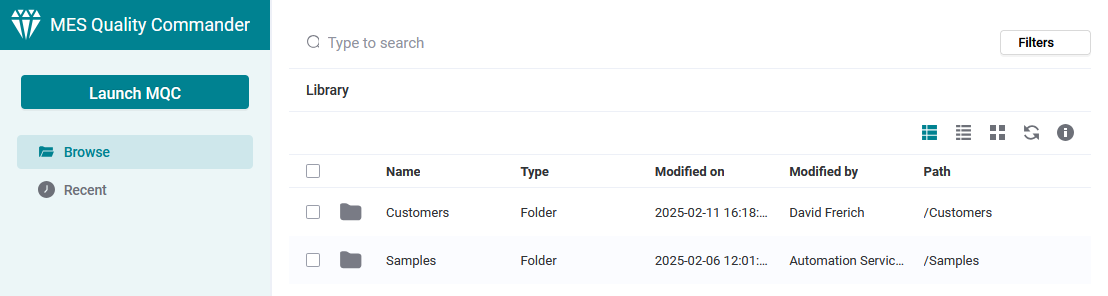
Figure 5.10 Server library with accessible folders and saved analyses
5.5.2.1. User Permissions for Library folders
Open the MQC desktop client and connect to the server as MQC admin.
From the menu bar select as shown in Figure 5.11.

Figure 5.11 Open the Library Administration via the MQC toolbar.
This opens the library administration dialog (see
Figure 5.12). Select an existing folder or click on
the New Folder button to add a directory folder to the server library.

Figure 5.12 Library administration dialog to add/delete folders and to set user permissions.
Click on Edit to set the permissions for the selected folder. In the folder
permissions dialog (Figure 5.13) uncheck
the option to be able to
specify different permissions.

Figure 5.13 Set detailed permissions for user or user groups via the folder permissions dialog.
Use the drop down to search for specific users or user groups. Select a user respectively user group from the list and use the arrow buttons on the right-hand side to set the permissions.
If you would like to allow the access to a specific folder for selected users only, you have to remove the user group from the section, which has been assigned per default to newly added folders.
Users belonging to the MQC Users group (see User Groups) need permissions for a folder.
Users belonging to the MQC Editors group have to be assigned to to be able to store MQC projects in the selected folder.
The user group “Automation Services Users” has to be assigned to for all folders in the library. This access is required for Update Projects (and export scheduled) to work.
5.5.3. Update Projects (and export scheduled)
The MQC Server Automation Services is a web service, which is responsible to automatically execute jobs.
To schedule such a job with the purpose to periodically update MQC projects stored in the server library, the job itself must be saved in the library.
The “Update Projects” Job also triggers Exports configured in the project. (see Export Configuration)
Exports with the following triggers are handled by the job:
Server Side Refresh
When a project needs to be refreshed and after the refresh is executed, exports with trigger are executed.
Server Side Schedule
All exports with this trigger are executed if they are due.
An export is due, when the date of the previous run of the export is less than the next export time, which is determined based on the frequency, start and end date of the export schedule configuration.
5.5.3.1. Add Update Job to Library
Open the MQC desktop client and connect to the server as MQC admin.
From the menu bar select as shown in Figure 5.14.

Figure 5.14 Open the Automation Service job builder via the MQC toolbar.
This opens the job builder dialog. Click on the Add button and choose
the job (see
Figure 5.15).

Figure 5.15 Select the job from the job builder dialog.
Now, the selected job must be added to the server library via
chosen from the menu bar on top
of the dialog. In the dialog navigate to the
folder, provide a name for your job, e.g.
“UpdateProjects” and click on Save (see
Figure 5.16).

Figure 5.16 Add the selected job to the MQC Server Library.
The update job is now available on the MQC server and can be scheduled there.
5.5.3.2. Ensure Library Access for the Automation Service
Configure the User Permissions for Library folders to allow the “Automation Services Users” access to modify projects in all folders, including the root, of the library.
5.5.3.3. Schedule Update Job
Open a browser and login to the MQC Server as MQC Admin. Then select from the dropdown at the menu bar (see Figure 5.17) to open the “Automation Services” page.

Figure 5.17 Go to page to schedule a job.
Click on the Schedule a job button to add a new job to the automation
services. Choose the Browse button and navigate to the
folder in the server library. The folder
should contain the update job, e.g. “UpdateProjects”, which was added to the
library before (see Figure 5.18).

Figure 5.18 Select the “UpdateProjects” job file from the server library.
After adding the job file, use the Add schedule button to define one or
multiple schedules to update the projects stored in the library (see
Figure 5.19).

Figure 5.19 Add one or more time schedules to the “UpdateProjects” job.
Figure 5.20 shows a job that is periodically executed each day at 0:00 AM and at 1:00 AM. This job can be disabled to stop the automatic update of all projects stored in the server library.

Figure 5.20 Enable or disable the configured job to update MQC projects stored in the MQC Server Library.
To control the automatic server update per stored project, please, refer to Keep the project up to date.
5.5.4. Internal Settings
5.5.4.1. MQC Working Directory
For some use cases, e.g. cloning a Git repository to be used as data location, MQC requires some space on a local drive. This also applies, when working with the Web Player. In this case, a temp directory on the server itself is used.
Per default, MQC uses the following path and automatically creates the directories, if not existing:
C:\MQC\Temp
If on your system the access to the C drive can not be granted, e.g. for security reasons, it is possible to configure another path to be used by MQC.
Open the MQC desktop client and connect to the server as MQC admin.
From the menu bar select as shown in Figure 5.21.

Figure 5.21 Open the Administration Manager via the MQC toolbar.
This opens the administration manager dialog. Choose the tab and then select the corresponding user group from the list on the left-hand side.
As shown in Figure 5.22, expand the section and select .

Figure 5.22 Change the MQC working directory via the AppDataPath in the preferences of a specific user group, e.g. the MQC Editors group.
Then, click on the Edit button to add the directory path to be used by MQC
and submit your change.
The MQC working directory path has to be changed for the user groups MQC Editors MQC Users, and Automation Services Users.
5.5.4.2. Parallelism
MQC uses parallel processing during content extraction to improve performance.
By default, MQC utilizes 70% of the available CPU cores for parallel execution.
If required, administrators can override this value by defining a different percentage in the Parallelism preference.
This makes it possible to assign different CPU usage limits for each user group, depending on system resources and internal policies.
To configure the Parallelism Preference, open the MQC desktop client and connect to the server as MQC admin.
From the menu bar select as shown in Figure 5.21.
Open the Preferences tab and select the corresponding user group from the list on the left-hand side (e.g. MQC User).
Expand the MQC section and select Parallelism.
In the right-hand pane, select the entry Percentage of available CPU cores used as amount of parallelism
Click Edit to modify the value and confirm your change.
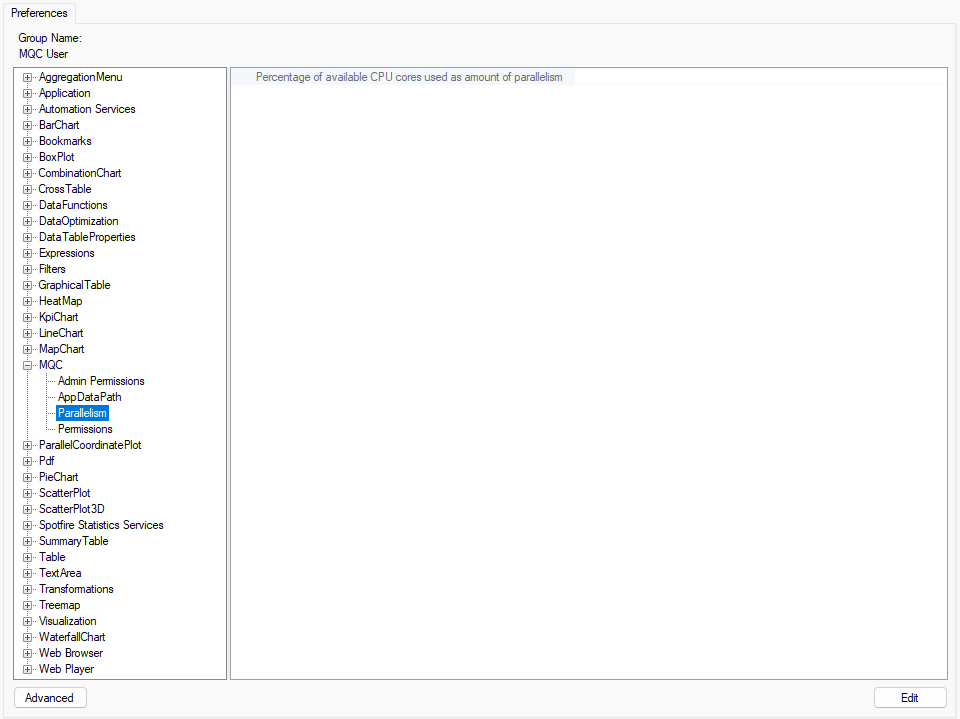
Figure 5.23 Change the Parallelism percentage via the preferences of a specific user group, e.g. the MQC User group.